The Android Accessibility Suite is essentially a toolkit on your Android device that allows you to use its features more fully. Android is the most popular operating system in the world with over 2.5 billion active users in over 190 countries. So, it only makes sense that Android devices should be usable by everyone.
What is Android Accessibility Suite?
The Android Accessibility Suite is a set of accessibility apps that allow you to use your Android device without looking at it or with a switch device.
It contains four (4) distinct apps to provide accessibility features on Android devices. These are:
- Accessibility Menu
- Switch Access
- TalkBack Screen Reader
- Select to Speak
In this article, we’ll explore step-by-step guides on how to use each of these features directly on your Android phone or tablet.
However, note that to be able to use the Android Accessibility Suite, your device must run on an operating system version of Android 6 (Android M) for basic accessibility features and Android 9 (Pie) or higher for the full suite.
➡️ Read also: Website Screen Reader Accessibility
How To Use the Accessibility Menu
The Accessibility Menu is a large on-screen menu to control gestures, hardware buttons, navigation, and more on your Android device. From the menu, you can:
- Take screenshotts
- Lock your screen
- Open Google Assistant
- Open Quick Settings and Notifications
- Turn volume up or down
- Turn brightness up or down
To use the Accessibility Menu, follow these steps.
Step 1: Turn on the Accessibility Menu
- Open the Settings app on your device.
- Navigate to Accessibility (on some devices, you’ll find this under Additional Settings)
- Tap on the Accessibility Menu.
- Tap the toggle button beside Shortcut to turn on the Accessibility Menu shortcut.
- Tap OK to accept the permissions
- To change how the shortcut works, tap Shortcut and choose the accessibility button, volume keys, or both.
Step 2: Use the Accessibility Menu
To open the Accessibility Menu, use the shortcut you set up:
- Tap the floating accessibility button, or press and hold both volume keys if the volume shortcut is enabled.
When the menu opens, tap any option to perform an action.
Swipe left or right to move between menu pages.
Tip: To Make Accessibility Menu buttons larger
- On your device, open the Settings app.
- Tap Accessibility and then Accessibility Menu
- Tap on Settings and then Large buttons.
How To Use Switch Access To Control Your Android Device
Switch Access lets people with motor impairments control an Android device using one or more switches or a keyboard instead of the touch screen. You can use switches to select items, scroll, enter text, and more.
How Switch Access works
Switch Access scans the items on your screen, highlighting each item in turn, until you make a selection.
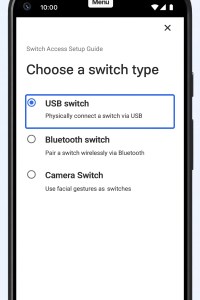
To use Switch Access, you’ll first need to turn on Switch Access. Then you’ll need to turn on at least one switch. There are several kinds of switches:
- USB Switch: physically connects you to a device that sends a keystroke signal to your Android device via USB.
- Bluetooth Switch: pairs you to a switch device like a standard USB or Bluetooth keyboard via Bluetooth.
- Buttons on your Android device: Built-in buttons on your Android device, such as the volume up and volume down buttons, can also be assigned to actions. (This option is intended for developers.)
- Camera Switch: uses your facial gestures as switches. It uses the front camera to see if you’re looking at the screen and to recognise your facial gestures.
Follow the steps below to set up Switch Access for your Android device.
Step 1: Connect switches to your Android device
First, connect an external switch device or keyboard to your Android device via USB or Bluetooth:
USB: Connect the switch or keyboard to your Android device with a compatible USB cable.
Bluetooth: On your Android device, navigate to Settings and then Bluetooth. After you pair a Bluetooth device for the first time, your devices can reconnect automatically.
Set up Camera Switch (on supported devices)
Camera Switch lets you control your device using facial gestures.
To use the Camera switch:
- Open Settings
Tap Accessibility and then Switch Access.
- Tap Camera Switch Settings
- Tap on a gesture to assign an action to it. Available gestures are:
- Open Mouth
- Smile
- Raise Eyebrows
- Look Left
- Look Right
- Look Up
Note: Camera Switch requires camera permissions and is only available on supported devices.
Step 2: Turn on Switch Access
- Open Settings.
- Tap Accessibility and then Switch Access.
- Tap Use Switch Access.
- In the confirmation dialog, tap Allow or OK to grant permissions.
Switch Access must be turned on before you can assign switches or use scanning.
Step 3: Choose basic scanning settings
Choose your basic scanning settings to fit your preferences and how many switches you have.
To get started, choose one of the options below:
- Auto-scanning with one switch
Auto-scanning automatically moves the highlight through the items on the screen until you make a selection. You press the switch to start scanning, then press the switch again to select the highlighted item. - Step scanning with 2 or more switches
With step scanning, press one switch to move the highlighting around the screen (the “Next” switch). Press the other switch to select the highlighted item (the “Select” switch). - Group selection with 2 or more switches
Group selection highlights groups of items on your screen, letting you narrow down the size of the group until you reach your choice. It works faster than auto-scanning or step scanning. Group selection is called “Option scanning” on some devices.
Step 4: Re-enable the on-screen keyboard (if needed)
When you connect a physical switch or keyboard, Android may hide the on-screen keyboard. To enter text using Switch Access, turn it back on.
- Open Settings.
- Tap System and then Languages & input.
- Tap Physical keyboard.
- Turn on Show virtual keyboard.
How To Use TalkBack screen reader
This feature reads out text and image content on your screen when you double-tap on it. That way, you can use your device without looking at it. When using this feature, you:
- Swipe right or left to switch between items
- Double-tap to activate a focused item.
- Drag with two fingers to scroll the screen.
On your Android device, you can turn this setting on or off. There are three options to do this:
Option 1: Use the volume key shortcut
You can use the volume key shortcut to turn TalkBack on or off. Use the shortcut the first time you turn on and set up your device or after your device is set up.
- On the side of your device, find both volume keys.
- Press and hold both volume keys for 3 seconds.
- To confirm that you want to turn TalkBack on or off, press both volume keys for 3 seconds again.
Option 2: Use Google Assistant
- Say “Hey Google.”
- Say “Turn off TalkBack” or “Turn on TalkBack.”
Option 3: Use device settings
If you have low vision or you help someone who is blind, you can navigate with settings to turn TalkBack on or off.
- On your device, open Settings.
- Select Accessibility and then TalkBack.
- Turn Use TalkBack on or off.
- Select OK.
➡️ Learn about screen readers: NVDA Screen Reader vs Jaws
How To Use Select To Speak
This feature selects pieces of text on your screen and reads them aloud to you. It is especially useful for blind or low vision users and users who are hard of hearing.
To use this feature, do the following:
- Go to your device’s Settings app.
- Tap on Accessibility and then Select to Speak
- Next, tap on the Select to Speak settings icon
- Select Text to speech (TTS) settings. Here you can select your Preferred Engine and Language.
- You can also adjust the Speech Rate and Pitch.
On newer Android versions (Android 11 and later), there are additional experimental features for Select to Speak such as:
- Read in background: to allow Select to Speak continue reading when you move to other screens or apps.
- Read text on images: to read aloud the text within images or the Camera viewfinder.
Want to explore automated accessibility?
Closing Thoughts
Accessibility is a must-have for all devices. While it has special advantages for users with disabilities, it allows everyone to use the device’s features and functionalities painlessly.
The Android Accessibility Suite is simply an upgrade to accessibility features found on Android phones with older operating systems.
To see which Android version you have:
- Open your phone’s Settings app
- Near the bottom, tap System > System update
- See your ‘Android version’ and ‘Android security update’.
Note that to use the Android Accessibility Suite, you must enable the app permission to modify your phone settings, retrieve windows content and observe your actions and the text that you type.