
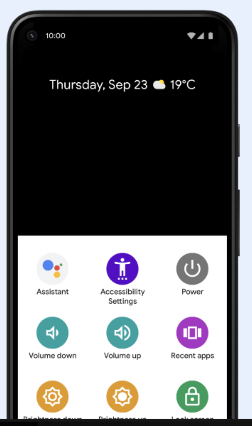
 The Accessibility Menu is a large on-screen menu to control gestures, hardware buttons, navigation and more on your Android device. From the menu, you can:
- Take screenshots
- Lock your screen
- Open Google Assistant
- Open Quick Settings and Notifications
- Turn volume up or down
- Turn brightness up or down
To use the Accessibility Menu, follow these steps:
Step 1: Turn on the Accessibility Menu
- On your device, open the Settings app.
- Navigate to Accessibility (on some devices, you’ll find this under Additional Settings) and then Accessibility Menu.
- Tap the toggle button beside Shortcut to turn on the Accessibility Menu shortcut.
- Tap OK to accept the permissions
- To switch between shortcuts or to select both options, tap again on Shortcut.
Step 2: Use the Accessibility Menu
To open the Accessibility Menu, use your Accessibility Menu shortcut:
- Swipe up with two fingers, or with three fingers if TalkBack is on.
- Tap Accessibility or the floating accessibility button.
- On the menu, choose an option.
- To find more menu options, go to the next screen or previous screen.
Tip: To Make Accessibility Menu buttons larger
- On your device, open the Settings app.
- Tap Accessibility and then Accessibility Menu
- Tap on Settings and then Large buttons.
Switch Access lets people with motor impairments control an Android device using one or more switches or a keyboard instead of the touch screen. You can use switches to select items, scroll, enter text, and more.
How Switch Access works
Switch Access scans the items on your screen, highlighting each item in turn, until you make a selection.
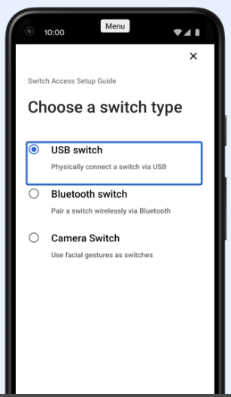
To use Switch Access, you’ll first need to turn on Switch Access. Then you’ll need to turn on at least one switch. There are several kinds of switches:
- USB Switch: physically connects you to a device that sends a keystroke signal to your Android device via USB.
- Bluetooth Switch: pairs you to a switch device like a standard USB or Bluetooth keyboard via Bluetooth.
- Buttons on your Android device: Built-in buttons on your Android device, such as the volume up and volume down buttons, can also be assigned to actions. (This option is intended for developers.)
- [New Feature] Camera Switch: uses your facial gestures as switches. It uses the front camera to see if you’re looking at the screen and to recognise your facial gestures.
Set up Switch Access for Android
Follow the steps below to set up Switch Access for your Android device.
Step 1: Connect switches to your Android device
First, connect an external switch device or keyboard to your Android device via USB or Bluetooth:
- USB: Connect the switch or keyboard to your Android device with a compatible USB cable.
- Bluetooth: On your Android device, navigate to Settings and then Bluetooth. After you pair a Bluetooth device for the first time, your devices can pair automatically.
To use the Camera switch:
- Tap Switch Access Settings and then Camera Switch Settings
- Tap on a gesture to assign an action to it. Available gestures are:
- Open Mouth
- Smile
- Raise Eyebrows
- Look Left
- Look Right
- Look Up
Step 2: Enable the on-screen keyboard (For USB or Keyboard Switches)
After you connect an external switch device or keyboard, Android automatically hides the on-screen keyboard. To enter text with Switch Access, you need to re-enable the keyboard.
To re-enable the on-screen keyboard:
- Open your Android device’s Settings app .
- Select Language & input. Follow the steps for your Android version:
- For devices with Android 7.0 and later: Select Physical keyboard and then Show virtual keyboard.
- For devices with Android 6.0 and earlier: Select Current keyboard and then Hardware (Show input method).
Step 3: Choose basic scanning settings
Choose your basic scanning settings to fit your preferences and how many switches you have.
To get started, choose one of the options below:
Auto-scanning with one switch
Auto-scanning automatically moves the highlight through the items on the screen until you make a selection. You press the switch to start scanning, then press the switch again to select the highlighted item.
Step scanning with 2 or more switches
With step scanning, press one switch to move the highlighting around the screen (the “Next” switch). Press the other switch to select the highlighted item (the “Select” switch).
Group selection with 2 or more switches
Group selection highlights groups of items on your screen, letting you narrow down the size of the group until you reach your choice. It works faster than auto-scanning or step scanning. Group selection is called “Option scanning” on some devices.
Step 4: Turn on Switch Access
- On the Switch Access settings screen, touch the back button to return to the Switch Access screen.
- Tap Use Switch Access.
- In the confirmation dialog, select OK to confirm permissions and turn on Switch Access.